We've learned so far that automation programs, smart devices and services are abstracted in HomeGenie as generic modules. Depending on the type, a module can then be presented to the end-user in the web interface with a different widget.
For example, to display a light dimmer module, the dimmer widget will be used as it will be for all modules of the same type.
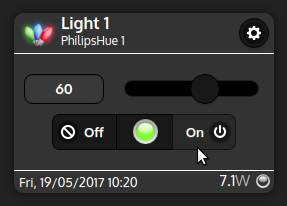
So, widgets are reusable UI components that are employed to display data and information of a bound module and that may also contain some controls (such as buttons, sliders, ...) for interacting with it.
Technically speaking a widget is made out of two piece of code: one is the HTML code for the view, which so determine how the widget will looks like in the user interface; the other is the Javascript code that will determine actions to be taken upon user interaction or when a parameter of the bound module is updated.
We'll now see how to explore, customize and create widgets by using the integrated Widget Editor.
Widget Editor
Widget Editor is accessible from the Configure → Automation menu. The main page lists all widgets that are currently available in the system. To edit an existing widget simply tap it from the list, while to create a new one select the add_circleAdd widget option from the actions menu located in the bottom-right corner.
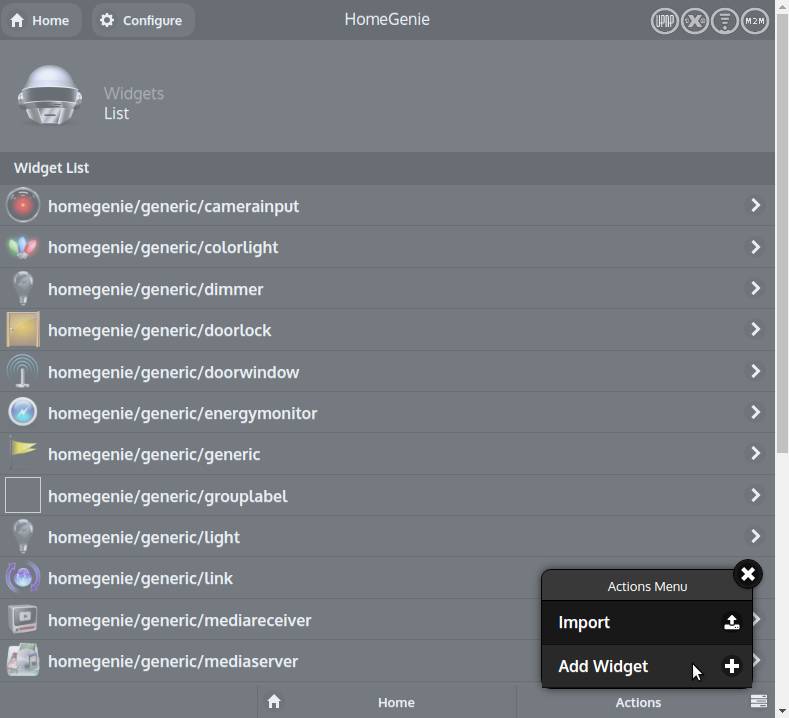
Widgets are identified by a 3 parts path consisting of brand/category/name. For example the light dimmer widget is identified by homegenie/generic/dimmer:
- brand: homegenie category: generic name: dimmer
When editing a widget we can see two panels. One is the code editor that can be switched from HTML to Javascript, while the other one is the preview panel where the widget is actually displayed and that we can use to test its functionality.
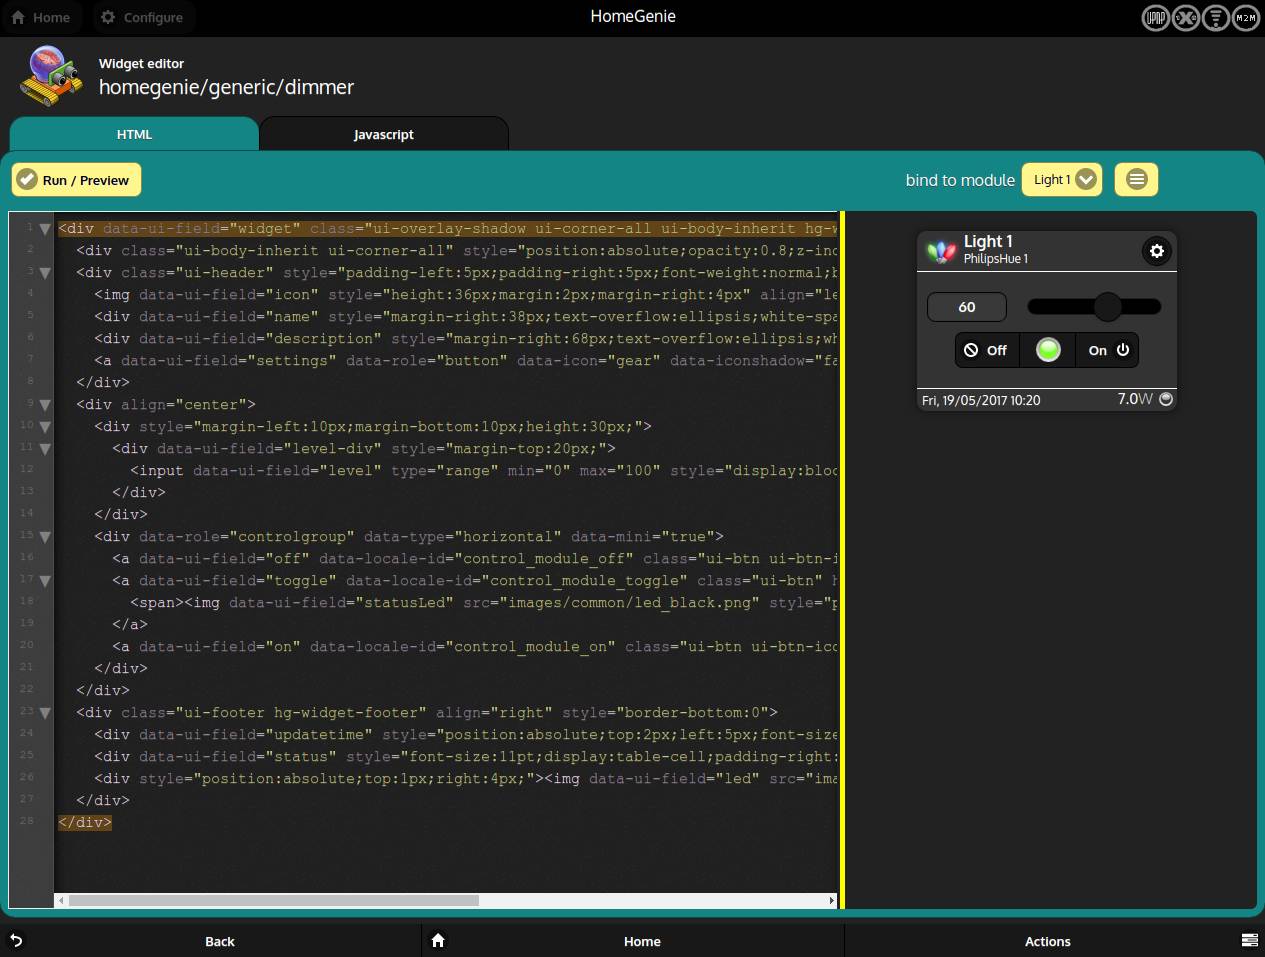
In order to test the widget we first have to choose a module to bind to from the select menu right above the preview. We can also simulate the change of a module parameter, to see how the widget reacts, by clicking the menu button that is located next to the bound module select menu.
The View - HTML
When designing the widget's View a few guide-lines have to be considered:
- never use the
idattribute for elements that have to be referenced in the Javascript code; use thedata-ui-fieldattribute instead - prefer the use of CSS classes provided by HG UI, which are jQuery Mobile's CSS classes and the ones defined by standard HG's CSS file
- since HG UI is based on jQuery Mobile, prefer using this framework instead of plain HTML; there are a couple of other frameworks/plugins that can also be used next to jQuery Mobile and that are listed at the end of this page
While editing the HTML code, to update the widget preview hit CTRL+S keys or press the check_circleRun/Preview button.
Example - HTML code for a basic widget container
<!-- main widget container -->
<div data-ui-field="widget"
class="ui-overlay-shadow ui-corner-all ui-body-inherit hg-widget-a">
<!-- widget content begin -->
<h1>Simple widget with a button</h1>
<input data-ui-field="test-btn" type="button" class="ui-btn" />
<br/>
Status: <span data-ui-field="status">...</span>
<!-- widget content end -->
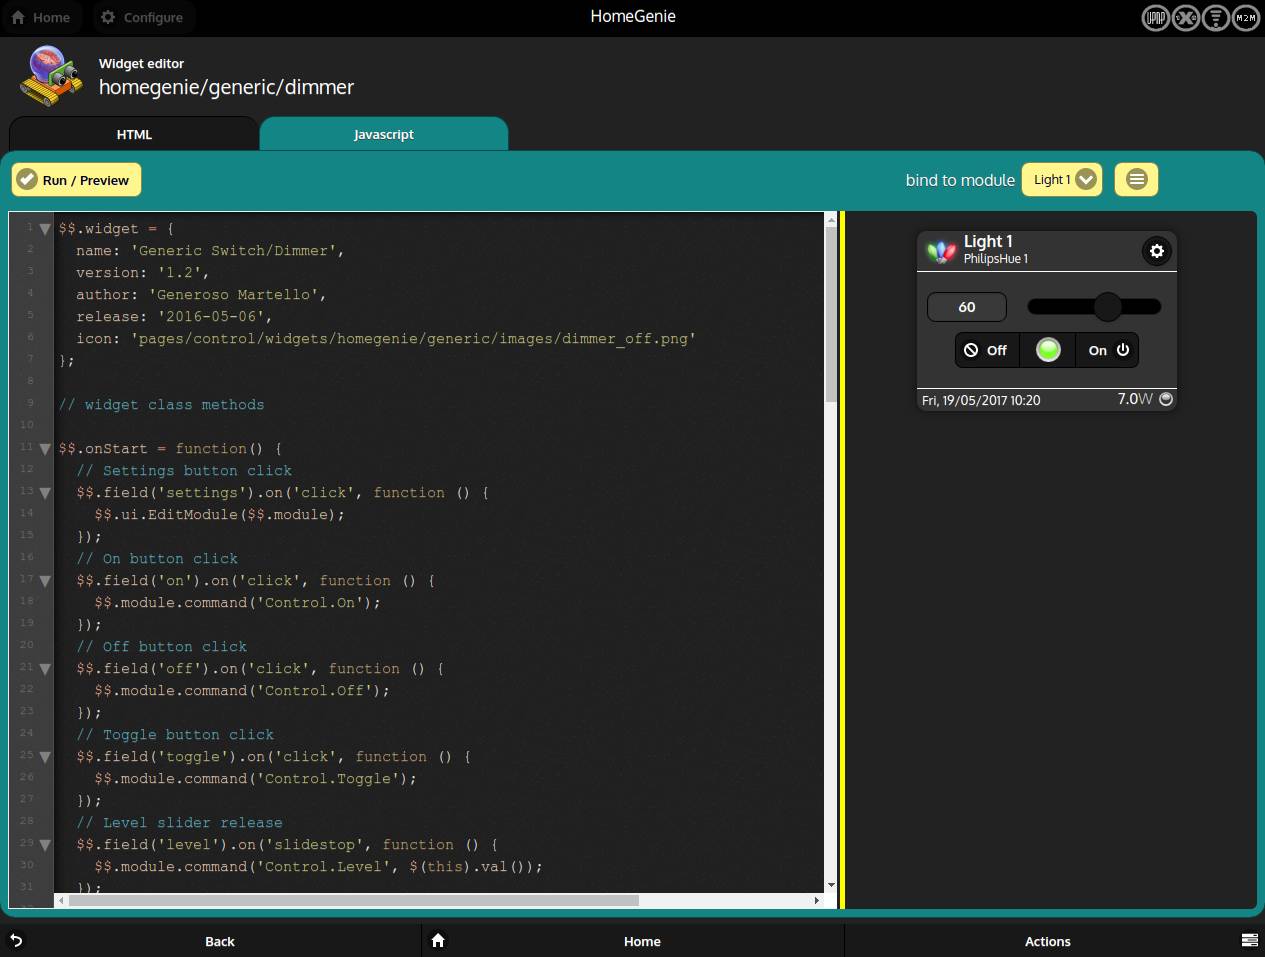
</div>The Controller - Javascript
The Javascript code takes care of updating the data displayed in the widget's view and also of sending proper commands when the user presses buttons and other controls that might be implemented in it.
In this Javascript code, the $$ object is the widget instance object that is used to implement the widget life-cycle and that holds other properties and objects used in the widget context, such as the bound module and some utility methods to handle most common tasks.
The following is the Javascript code skeleton required to implement the widget life's cycle:s
// this field is used to provide infos about the widget
$$.widget = {
    name   : 'Simple widget',
    version: '1.0',
    author : 'Foo Bar',
    release: '2016-05-06',
    icon   : 'path/to/some/icon/image.png'
}

// called after the widget is loaded
$$.onStart = function() {
}

// called each time the UI needs to be fully updated
$$.onRefresh = function() {
}

// called each time a parameter of the bound module is updated
$$.onUpdate = function(parameter, value) {
}

// called when the widget is requested to stop/dispose
$$.onStop = function() {
}
Other objects and properties available through the $$ object are:
$$.field(...)
This method is used to get the jQuery object for the widget's element having the data-ui-field attribute set to the given <field_name>.
Syntax
$$.field('<field_name>')Example
// use of $$.field in the onStart method to register
// the click event handler for the button 'test-btn'
// (see the HTML code in the previous example)
$$.onStart = function() {
  // button click handler
  $$.field('text-btn').on('click', function () {
    $$.field('status').html('button clicked!');
  });
}
$$.module
Returns the module object bound to the widget.
Module Properties (example instance)
$$.module => {
    Domain: "HomeAutomation.PhilipsHue",
    Address: "1",
    Name: "Porch Light",
    Description: "module description",
    DeviceType: "Dimmer"
}
Module Methods
$$.module.prop('<name>')
Gets the module's property specified by<name>.
Example
var level = $$.module.prop('Status.Level');
if (level != null) {
    console.log('Module level:', level.Value);
    console.log('     updated:', level.UpdateTime);
}
$$.module.command('<api_command>', '<options>', <callback_fn>)
Invokes the given<api_command>on the module.
Example
// turn off the module
$$.module.command('Control.Off');
// set dimmer level to 50%
$$.module.command('Control.Level', '50', function(res) {
    console.log('command response:', res);
});
$$.apiCall(...)
Invokes a Web API method.
Syntax
$$.apiCall('<api_method>',
           '<domain>',
           '<address>',
           '<method_options>',
           <callback_fn>)
Example
// TODO: add some examples...
/*
# Quick-Reference for other methods/properties
# exposed by '$$' object

 Get the jQuery element in the main document
   $$.field('<document_tree_selector>', true)

 Shorthand for HG.Ui
   $$.ui

 Shorthand for HG.WebApp.Utility
   $$.util

 Shorthand for HG.WebApp.Locales
   $$.locales

 Blink a widget field and the status led image (if present)
   $$.signalActity('<widget_field_name>')

*/
Old widget version
The Javascript code implementation discussed so far is the recommended way for writing a widget's controller and it is called v2. Anyway there are still a few widgets that might use an old way for writing the widget's controller.
This old version of widget's controller, which is called v1, is implemented as a JSON object that is formatted as shown in the example below:
Example - Minimal javascript code for v1 widgets
[{
  // use this field to assign a default image to the widget
  IconImage: 'pages/control/widgets/homegenie/generic/images/icons/robot.png',

  // this field is used for initializing the widget once loaded
  Initialized: false,

  // this method is called each time the module bound to this widget is updated
  // put here the code for displaying module's data
  RenderView: function (cuid, module) {
    var container = $(cuid);
    var widget = container.find('[data-ui-field=widget]');
    var button = widget.find('[data-ui-field=test-btn]');
    var name = widget.find('[data-ui-field=name]');
    if (!this.Initialized) {
        this.Initialized = true;
        // register widget's event handlers
        button.on('click', ButtonClicked);
    }
    name.html(module.Name);
  },

  ButtonClicked: function() {
    // handler for the button click event here
    // this will make an API request in most cases
    // using jQuery
    $.get('/api/'+module.Domain+'/'+module.Address+'/Control.On', function(res){
        // request completed....
    });
    // or alternatively use HG Javascript API
    // (see the table below for more HG Javascript API examples)
    var ctrl = HG.Control.Modules;
    ctrl.ApiCall(module.Domain, module.Address, 'Control.On', '', function(res){
        // request completed...
    });
  }
}]
The only mandatory fields in the Javascript code of a v1 widget are IconImage and RenderView:
- IconImage is the image used to identify the widget in the UI. See List of HG UI icons.
- RenderView is a function that HG UI will call everytime the bound module is updated, passing to it the parameter
cuid, which is the id attribute of the widget's container and themoduleparameter, which is a reference to the bound module.
Themoduleobject has the following property fields:Domain,Address,Name,Description,Properties.
As shown in the ButtonClicked handler, in most cases, when the user click a widget control, an API request is made. The end-point of the request will be usually an automation program that is listening to API calls for that module domain.
Prefer using v2 implementation since the v1 implementation might be deprecated at some point.
Both v1 and v2 widgets can use HG Javascript API.
HG Javascript API - Common functions
// use the "Utility" namespace
var utils = HG.WebApp.Utility;

// get a reference to a module by a given <domain> and <address>
var mod = utils.GetModuleByDomainAddress(domain, address);

// get a module parameter by name
var level = utils.GetModulePropertyByName(mod, 'Status.Level');
console.log('Module name = ' + mod.Name + ' Status.Level = ' + level.Value);

// show a confirmation request popup
utils.ConfirmPopup('Delete item', 'Are you sure?', function(confirmed) {
    if (confirmed) {
        // the action was confirmed...
    } else {
        // action canceled
    }
});

// format a date
var today = utils.FormatDate(new Date());
// format a date with time
var todayTime = utils.FormatDateTime(new Date());

// use the "Control" namespace
var control = HG.Control.Modules;

// call HG API function
control.ApiCall(domain, address, command, options, function(response){
    // handle response here...
});

// use the "Programs" namespace
var progs = HG.Automation.Programs;

// Run a program
progs.Run(programId, options, fuction(response){
    // handle response here...
});
HomeGenie Javascript API
See HG Javascript API on github for a complete list of available namespaces and commands.
Frameworks and Plugins
The following is a list of framework/plugins that can be used in a widget.